
A well-designed backsplash is both a functional necessity and a defining visual element in any kitchen remodel. It contributes texture, color, and material contrast, while also protecting the wall surface from moisture, heat, and daily wear. Decisions about backsplash tile placement—particularly where to begin and end—have a significant impact on the overall success of a kitchen design.
With the wide range of materials available today, including stone, tile, ceramic tile, porcelain tile, glass tile, painted stone tile, quartz, quartzite, stainless steel, soda glass, terrazzo, wood, and marble, the options for backsplash design are virtually limitless.
After completing hundreds of kitchens in Walnut Creek and throughout the East Bay, we’ve seen that every space presents its own opportunities and challenges. This guide explores common scenarios—corners, windows, ranges, hoods, niches, peninsulas, U-shaped kitchens, L-shaped kitchens, and more. We offer guidance on when to follow standard practice and when to take a more customized approach to where your backsplash starts and stops.
Is there a good rule of thumb for kitchen backsplashes?
Yes—and no. A helpful guideline is to look for natural stopping points in your kitchen. These might be where countertops meet cabinets, walls, or architectural transitions. A clean backsplash start and stop often runs from the countertop to the upper cabinets or ceiling, and from wall to wall or cabinet to cabinet, creating a cohesive and intentional look.
Function should also influence your design. Backsplashes for food prep areas are helpful but not always essential. The highest priority zones are behind ranges and sinks, where heat, moisture, and splatter are frequent. In lower-impact spaces—like coffee stations, bar areas, or display shelves—you might opt for a shorter runner or no backsplash at all.
Of course, a rule of thumb is just that. Many kitchens benefit from customized solutions that go beyond the standard layout. We’ve designed both traditional and creative approaches to help backsplashes support the overall flow and aesthetic of the space.
How to decide where to end backsplashes in corners
Backsplash tile in corners can stop cleanly at the edge or wrap around, depending on the layout and visibility.
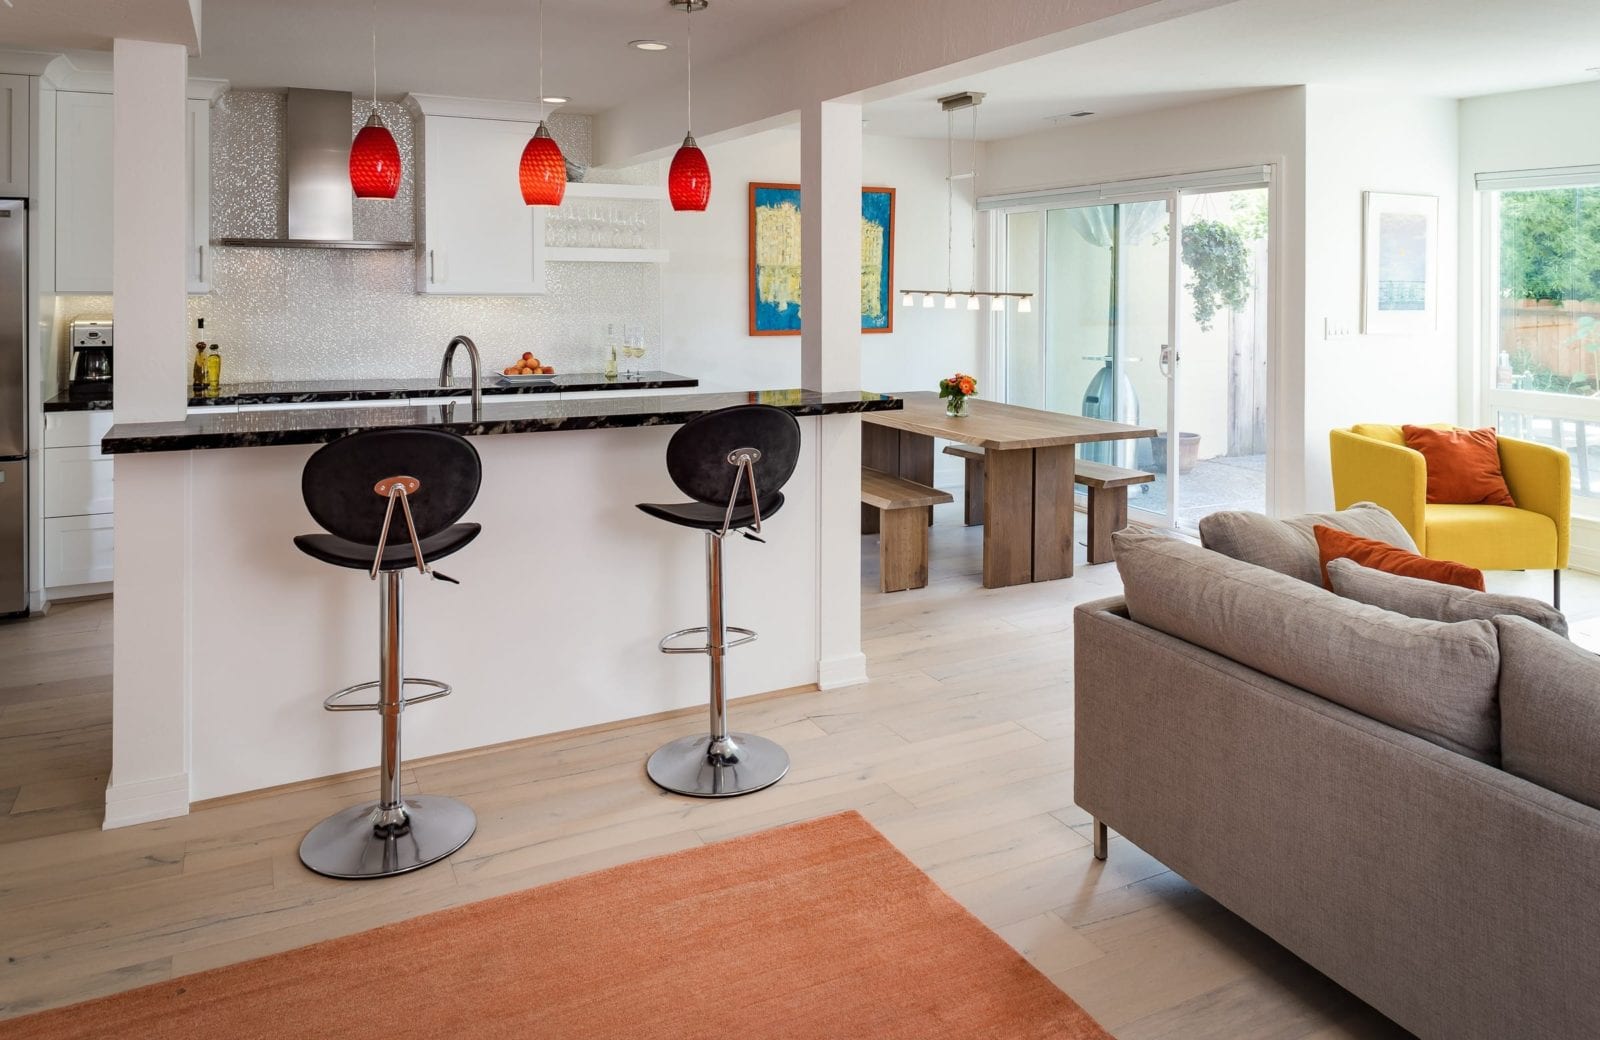
In this Ruby Hill, Pleasanton wet bar, the glass mosaic tile in a subway pattern continues into the corner on the left side of the pass-through and to the front edge of the adjacent countertop. This “side splash” approach provides both visual continuity and functional splash protection. On the right side of the opening, the design takes a different turn: the backsplash stops cleanly at the corner, with the transition into the family room softened by using a painted jamb for a clean, finished look.

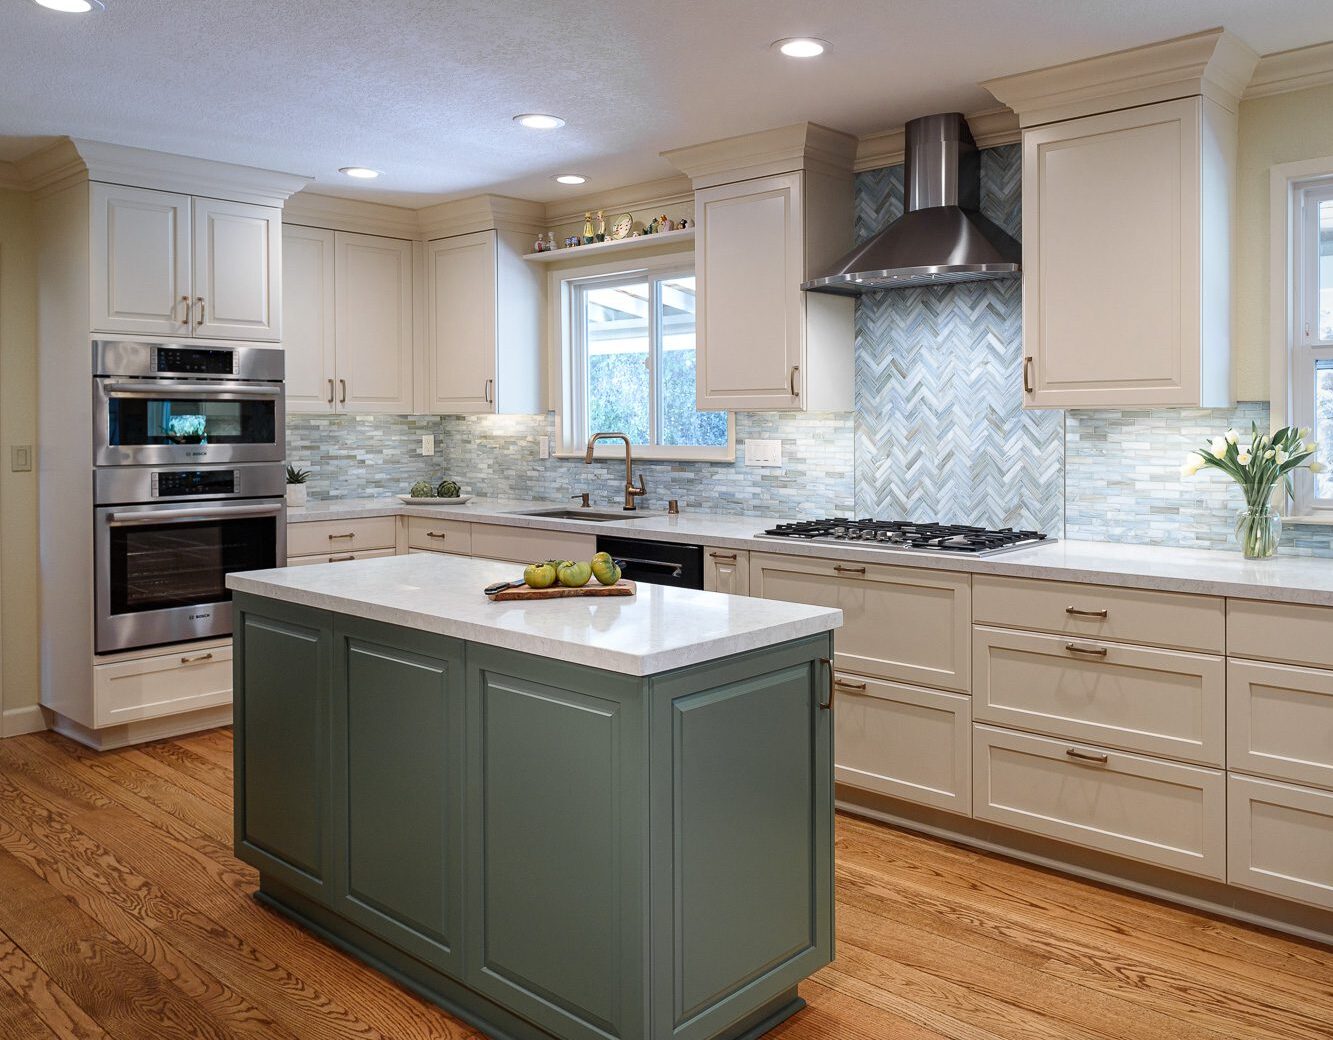
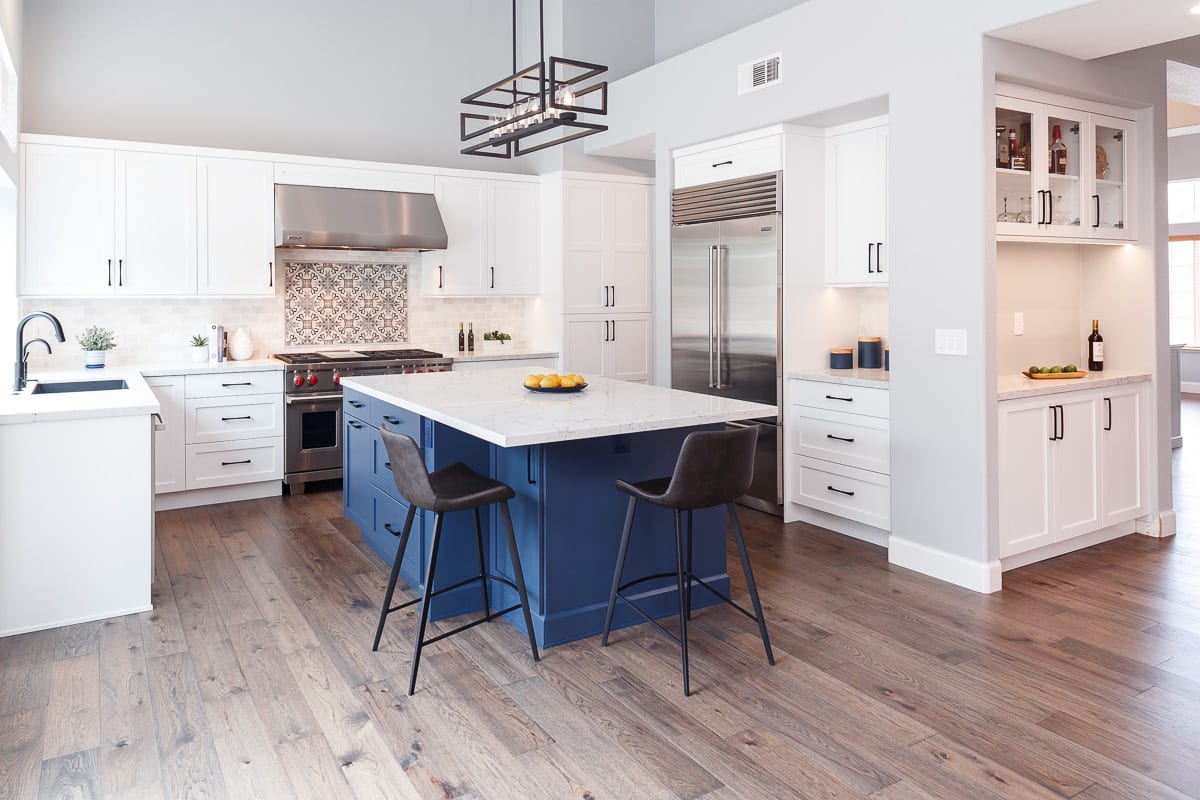
A similar choice was made in this two-tone Walnut Creek kitchen with a green island. The backsplash tile continues around the corner to finish at the oven panel, expanding the backsplash zone beyond the chevron focal point and underneath all the cabinets to ensure continuity.
Corners offer a great opportunity to either transition the backsplash cleanly or extend the design—there’s no one right answer, but your choice should feel purposeful and well integrated with the rest of the space.
How far up the wall should a kitchen backsplash go?
How high your backsplash should go depends on your kitchen layout, your design goals, and how much visual impact you want. There’s no one-size-fits-all answer—but there are a few common approaches we use in our Walnut Creek and East Bay kitchen remodels:
- Cabinet height—The most typical choice is from the countertop to the bottom of the upper cabinets—clean, simple, and functional.
- Full height – Run the backsplash from the countertop to the ceiling for a more modern or dramatic look. This works exceptionally well behind ranges, hoods, and open shelving.
- Partial height or runners – In areas like bar counters or less-used prep zones, a short backsplash runner (4–6 inches) can be a great design choice and still offer protection.
- Creative combinations—Some kitchens use a mix of full height behind the range, cabinet height elsewhere, and a runner in other spots.
Ultimately, the height of your backsplash is part of your overall kitchen design. It can help define zones, highlight architectural features like windows or niches, or bring in a sense of balance. And yes, you can absolutely break the “rules” to match your style, space, and budget.
How to run backsplashes to the ends of countertops
Stopping your backsplash in the right place helps create a clean, finished look. That usually means ending it exactly where the countertop ends to maintain a neat, balanced appearance. If your countertop ends mid-wall, as in open plan kitchens, it’s best to stop the backsplash at a cabinet or counter to avoid awkward transitions.
When the backsplash doesn’t reach a wall or cabinet, adding a metal trim can provide a crisp, professional finish that ties everything together.
One additional detail to remember: if there’s a light switch near the edge, make sure the backsplash covers it fully or stops before it. Avoid letting the tile end awkwardly in the middle of a switch plate, making the design feel incomplete.
How to run backsplashes from cabinet to cabinet
Running a backsplash from cabinet to cabinet is one of the most straightforward and visually balanced approaches. It creates clean lines and ensures the backsplash integrates with the rest of the cabinetry.
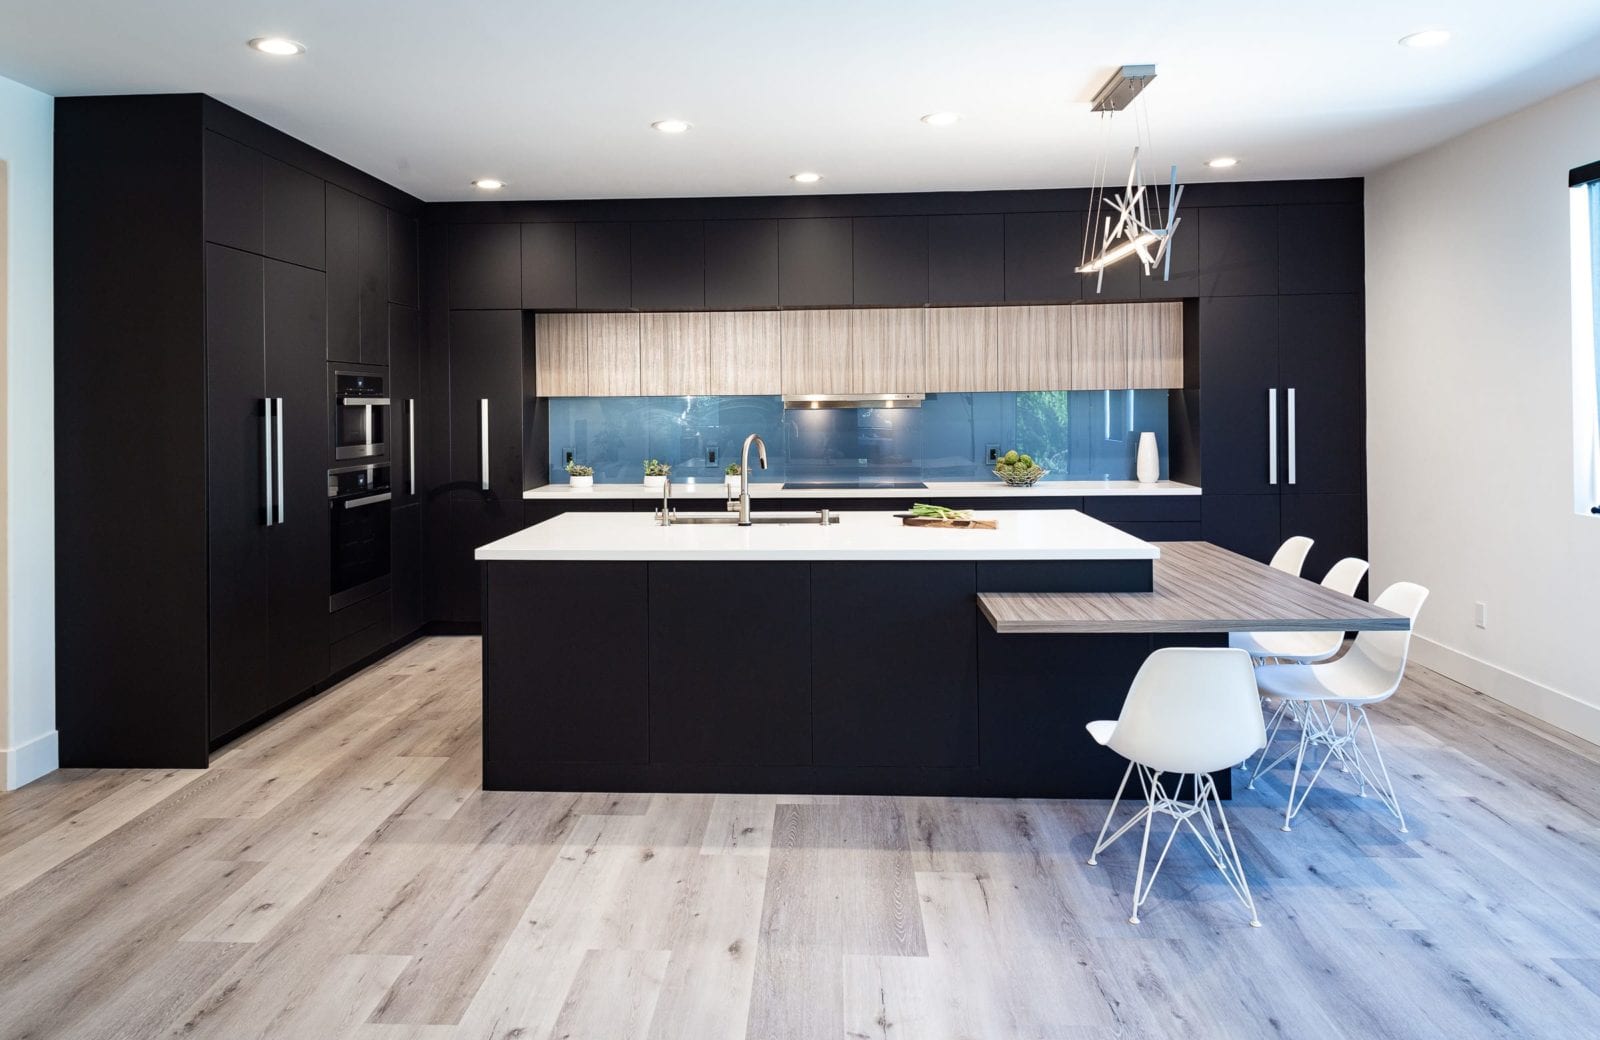
In this award-winning San Ramon kitchen, a striking soda glass backsplash runs perfectly from one cabinet edge to the other, reinforcing the sleek, color-blocked design.
Another great example comes from this modern Alamo kitchen, where the backsplash stops neatly at the end of the cabinet run near the peninsula. It ends at the other end of the countertop neatly where both cabinetry and countertop end. This layout keeps the design focused and symmetrical.

How to run backsplashes from wall to wall
A wall-to-wall backsplash creates a clean, continuous look by extending the tile across the entire length of a single wall. This approach works especially well in well-defined kitchen layouts like U-shaped or L-shaped spaces, where a peninsula naturally defines the kitchen zone. In open-plan kitchens, you may need to rely on cabinets, peninsulas, or visual breaks rather than physical walls to determine a logical backsplash start and stop point.
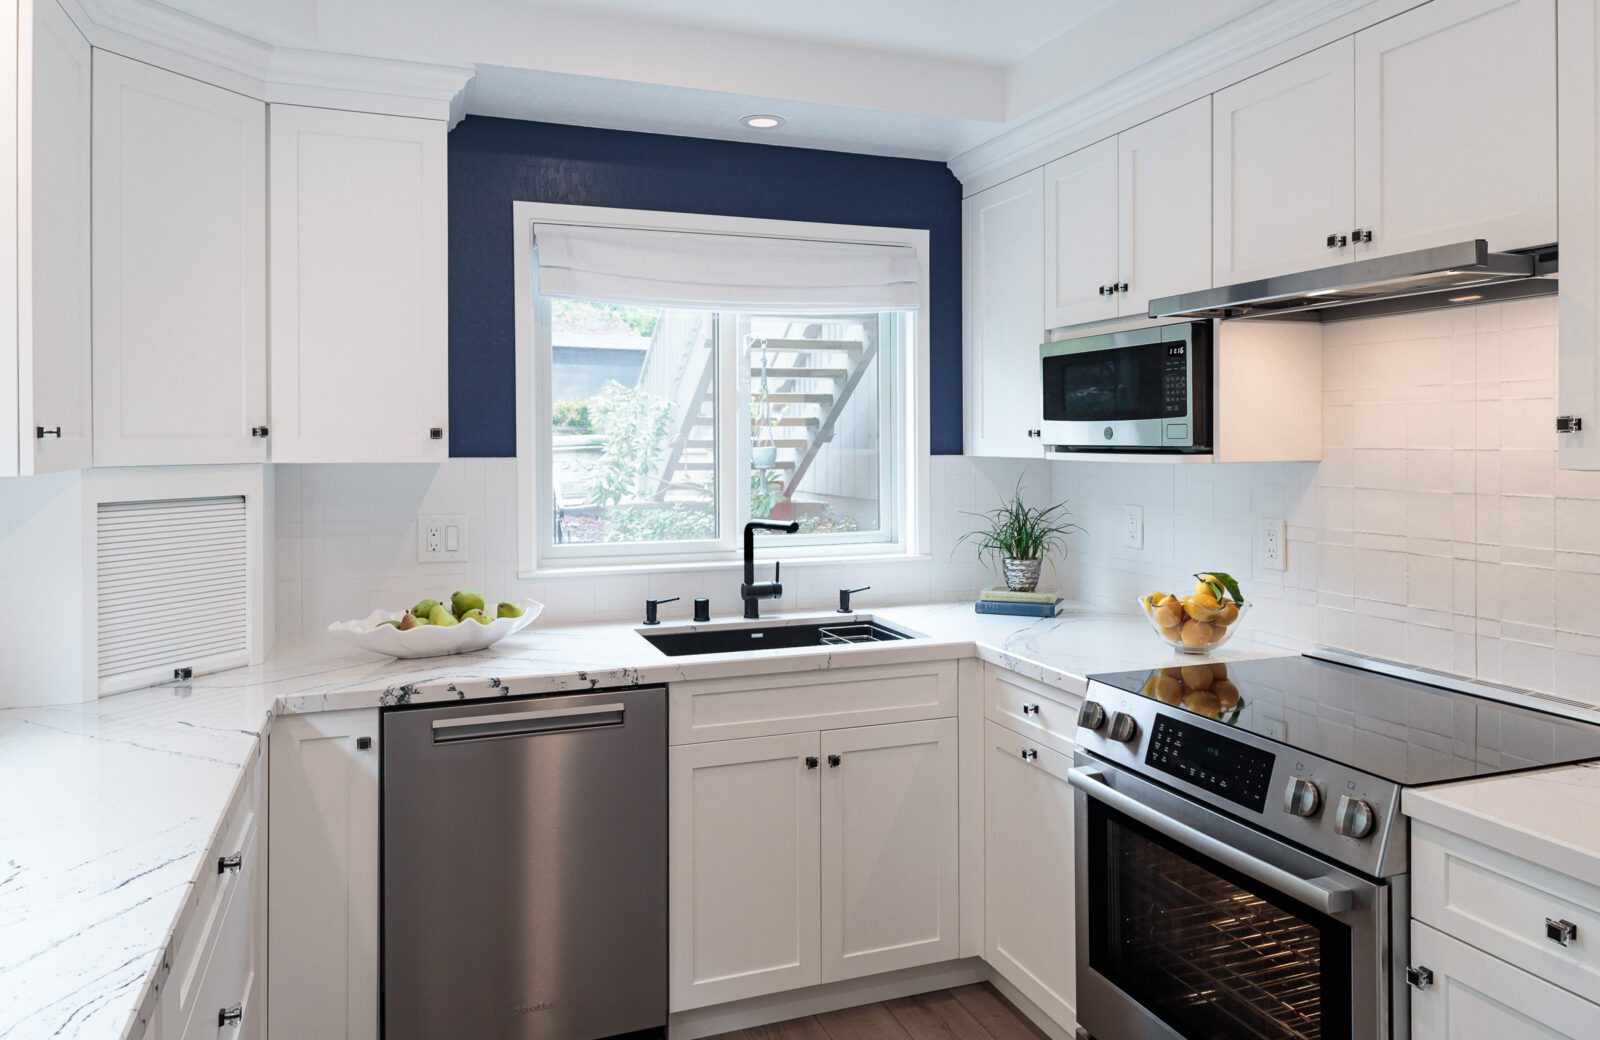
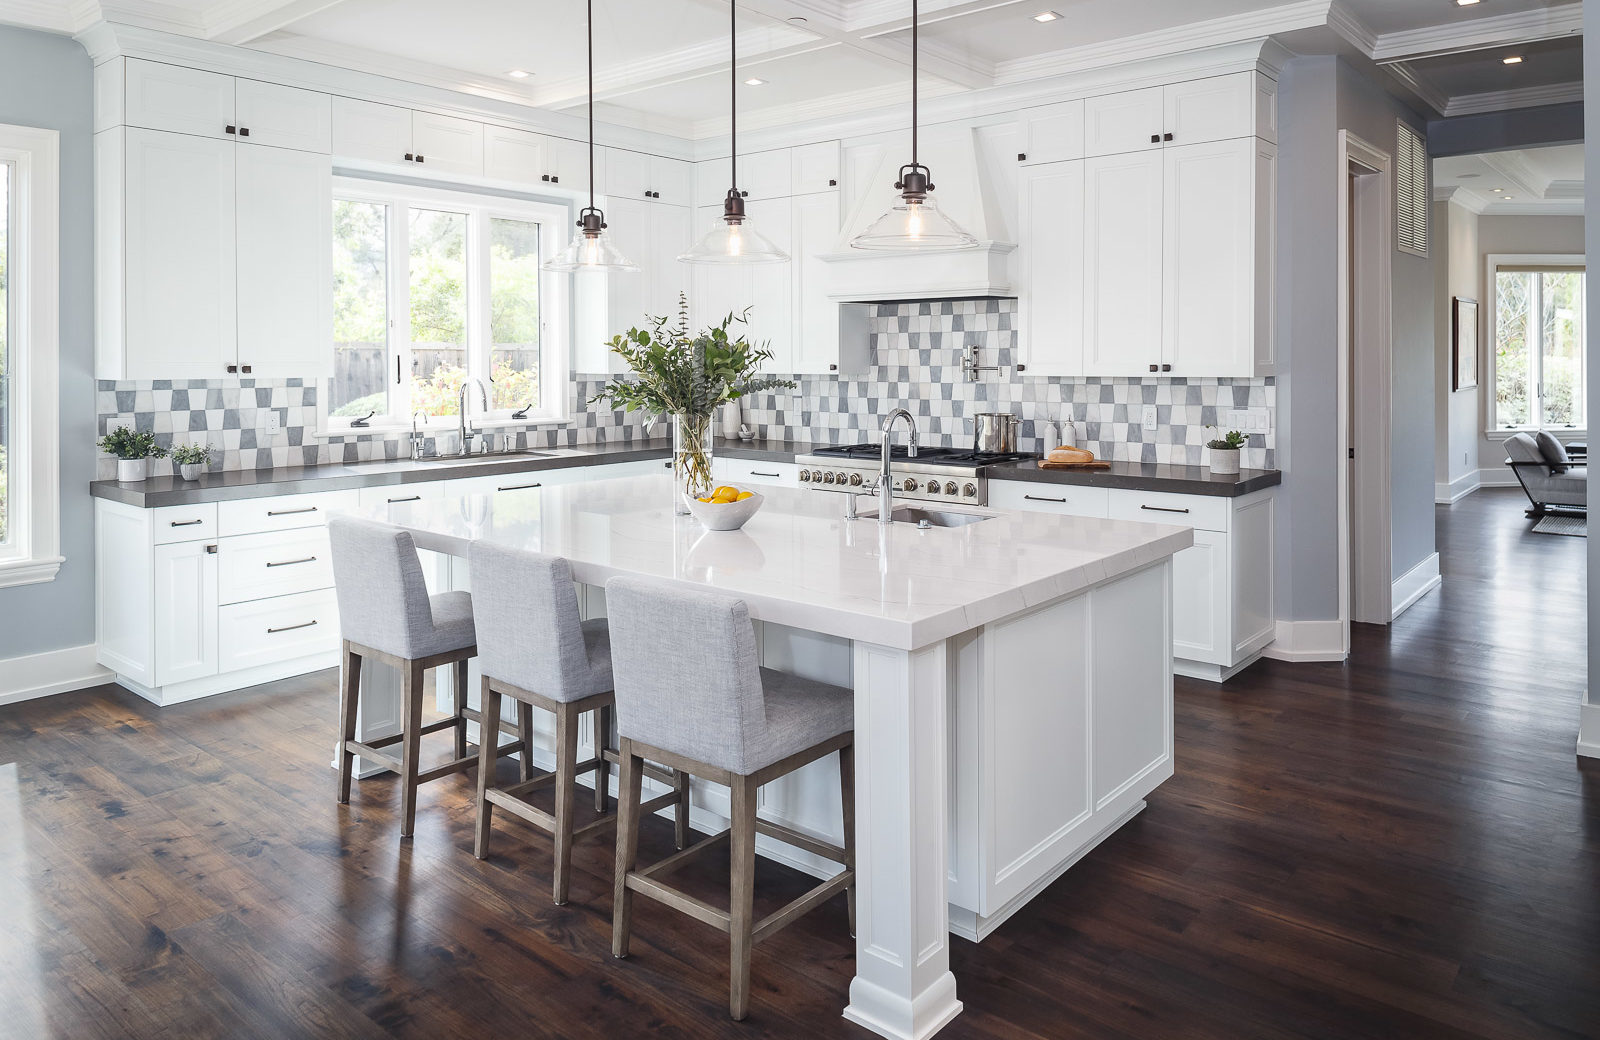
This U-shaped kitchen in Rossmoor, Walnut Creek, is a great example. The white, textured backsplash tile runs wall to wall along two sides, continues under the window trim, and extends to the hood and upper cabinets behind the range.
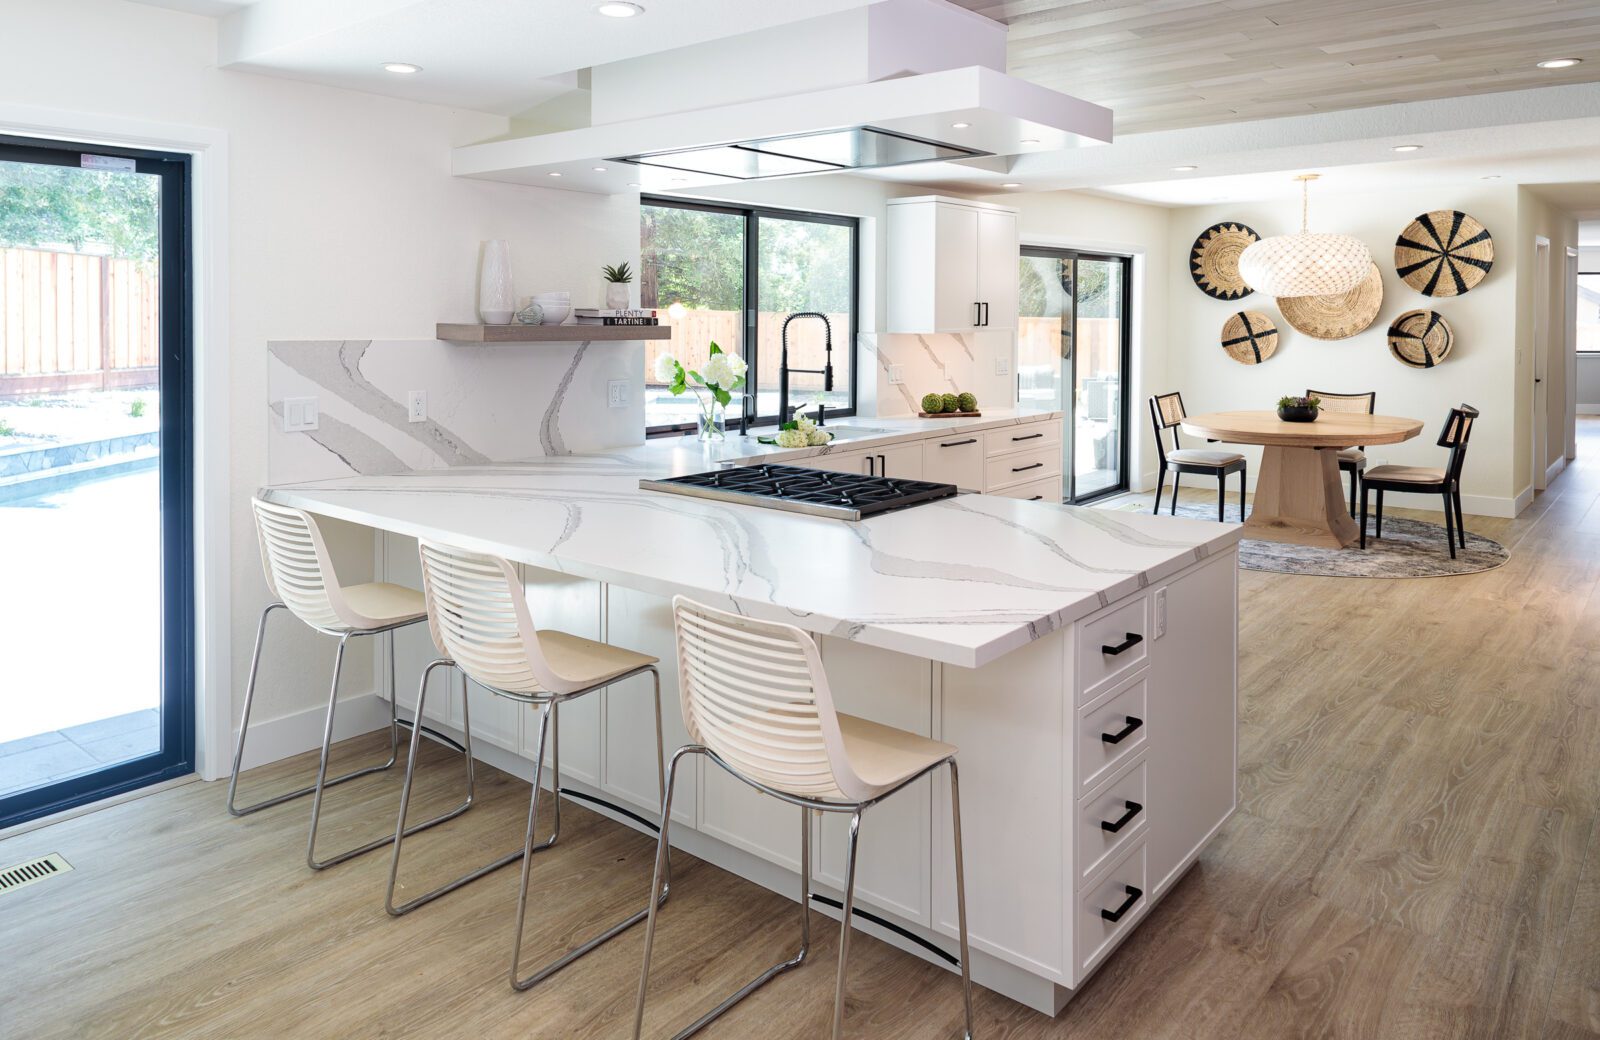
This U-shaped kitchen features a glass mosaic backsplash tile that runs wall to wall along two sides, creating a cohesive and continuous look. The tile extends under the window trim and continues behind the hood to the ceiling, adding height and visual interest. Above the windows, the design shifts to painted drywall, showcasing a thoughtful mix of backsplash design choices and smart decisions about where to start and stop the material.
How to run Backsplashes from countertop to ceiling
Extending your backsplash from countertop to ceiling creates a striking, seamless look, especially on walls without cabinets or in open-plan kitchens. A full-height backsplash adds drama, draws the eye upward, and can turn a simple material into a standout design element.
In this Ruby Hill kitchen remodel in Pleasanton, the backsplash features two types of tile: a Dune Duende metal field tile and a Porcelanosa sparkly white tile centered behind the induction cooktop. Together, they create a stunning focal wall that runs to the ceiling.
Another example in this award-winning Walnut Creek remodel takes the same approach, with the backsplash tile extending from the countertop to the ceiling behind open shelves and a stainless steel hood. This layout works especially well when an entire wall is free for a creative design.
Settle the question of whether to run your backsplash to the ceiling by focusing on style and intention. As these examples show, a ceiling-height backsplash can make a bold statement—whether you’re using quartz, granite, marble, or tile—and works beautifully with a variety of materials, textures, and colors.
How to design backsplashes around range hoods and ranges
The area around the range and hood is one of the most striking places to showcase your backsplash design. Whether using bold patterns, mixed materials, or ceiling-height tile, this space can serve as the visual centerpiece of your kitchen remodel.
In this San Ramon kitchen remodel, a custom two-toned brushed metal hood is paired with brushed gold accent tile. The metallic backsplash tile complements the custom hood finish, cabinet hardware, laser-cut panels on the island, and the lighting, tying the whole design together.

This Walnut Creek, CA kitchen remodel features a glass mosaic tile backsplash that runs from the countertop to the cabinets and continues to the ceiling behind the hood. The tile layout shifts from a classic horizontal subway pattern to a bold chevron design behind the cooktop, adding visual interest and clearly defining the cooking zone.
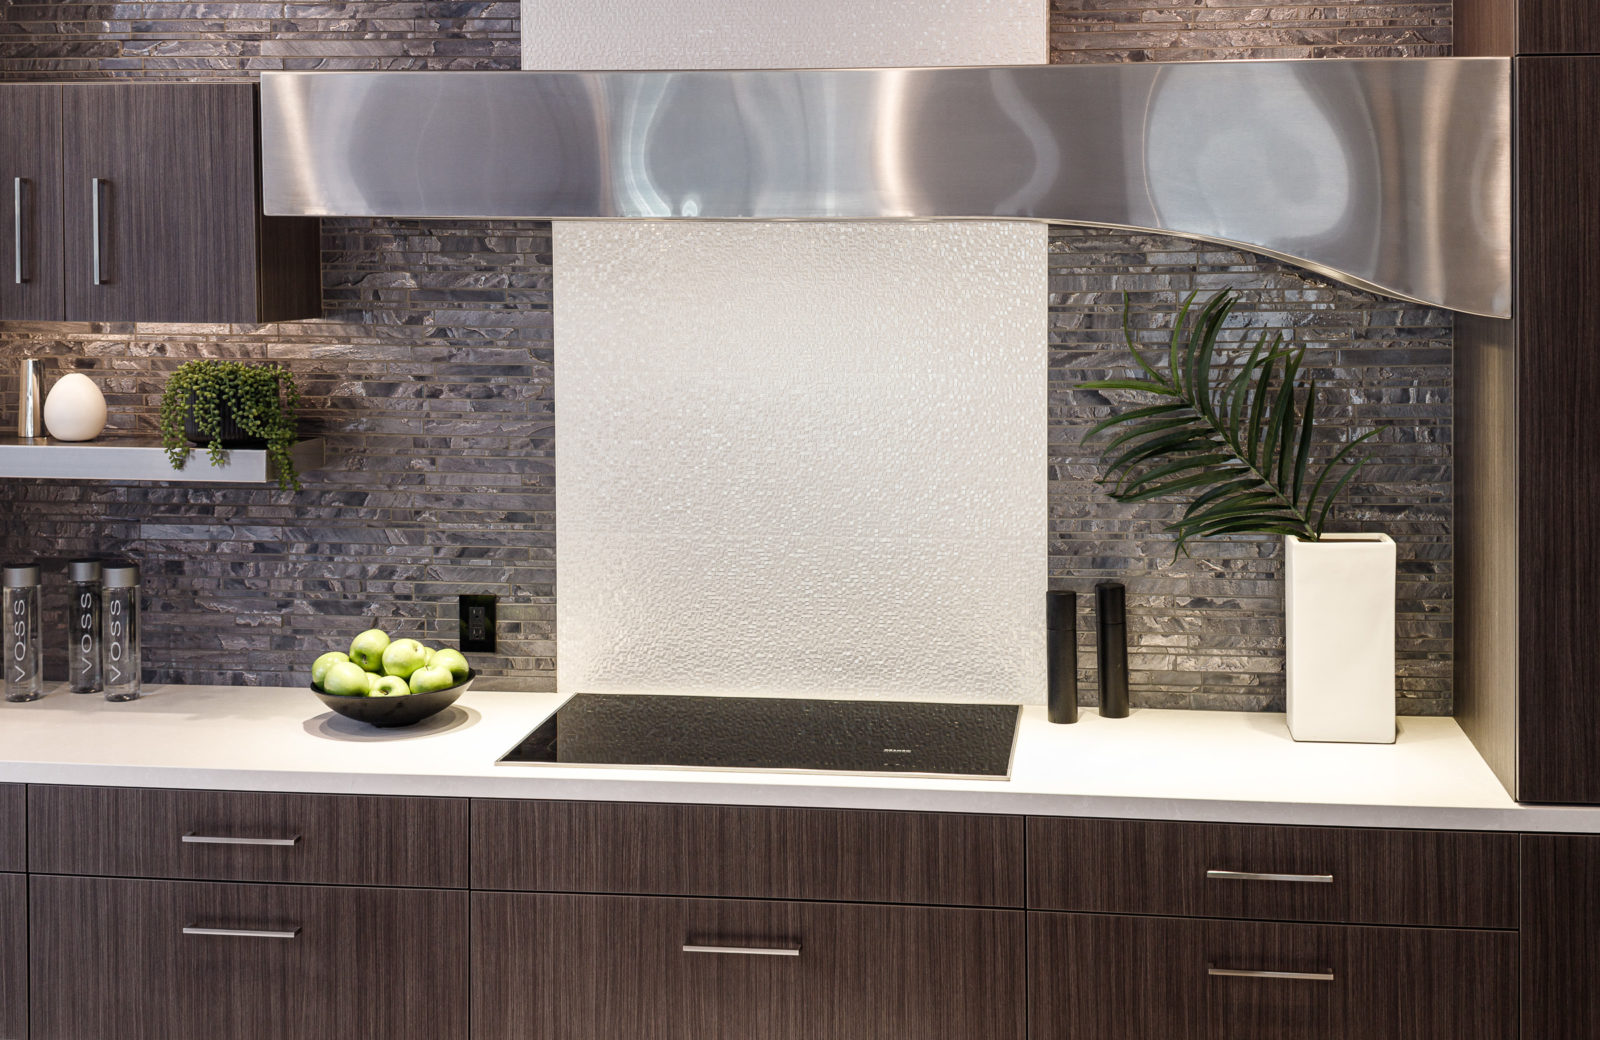
In this award-winning Pleasanton kitchen, two backsplash materials define different zones: a gray glass mosaic tile lines the main wall, while a white glass tile climbs from countertop to ceiling behind the hood. The shift in material draws attention to the cooktop wall and it adds a sleek contrast in a modern setting and highlights the custom stainless steel hood. The white tile also hides the ductwork above the custom hood.
This transitional Alamo kitchen features an off-white glass subway tile backsplash that extends up to the hood and from cabinet edge to cabinet edge. Above the range is a patterned ceramic tile arranged in a subtle geometric pattern, creating a focal point that defines the cooking area without overpowering the overall design. The layout variation adds texture and visual interest while maintaining a clean, cohesive look.
In this Walnut Creek kitchen remodel, the backsplash is finished in a soft gray mosaic subway tile that adds a clean, contemporary feel. Above the range, a decorative tile inset creates a striking focal point, introducing texture and pattern that complement the surrounding surfaces without overwhelming the design.
In this Walnut Creek kitchen, the backsplash is both functional and decorative. A bold mosaic-patterned glass tile defines the range hood by continuing behind it and reaching all the way to the ceiling. The full-height installation emphasizes the vertical space and makes the cooktop wall a natural focal point.
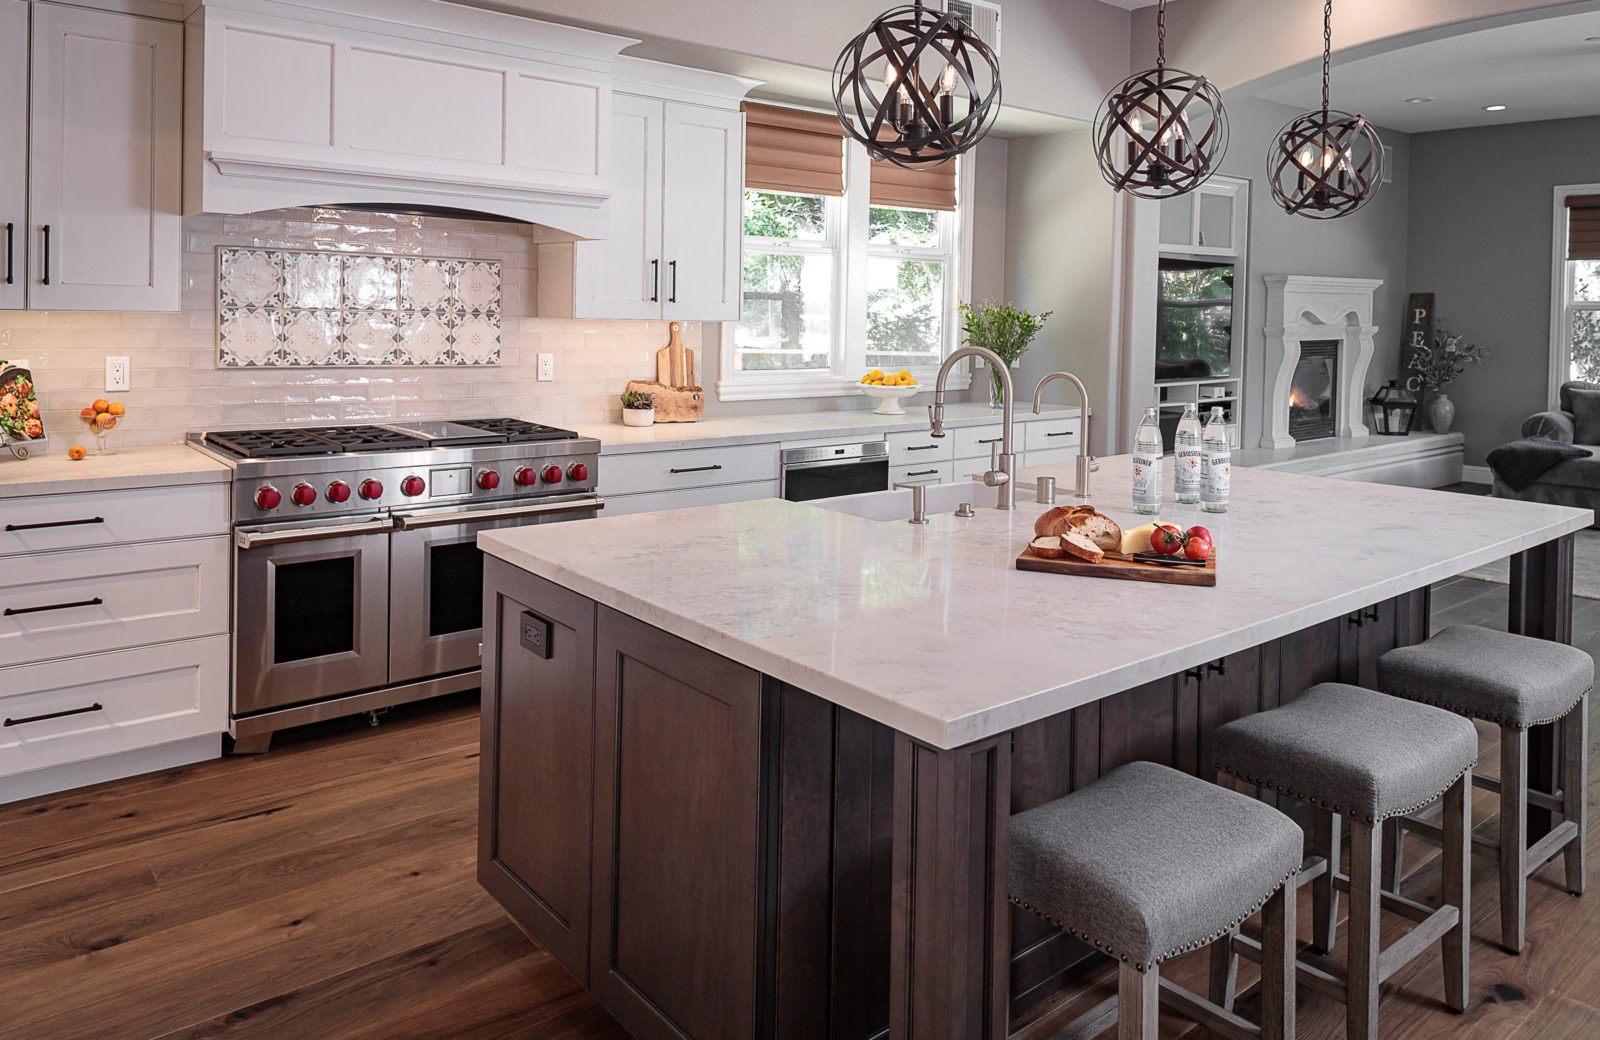
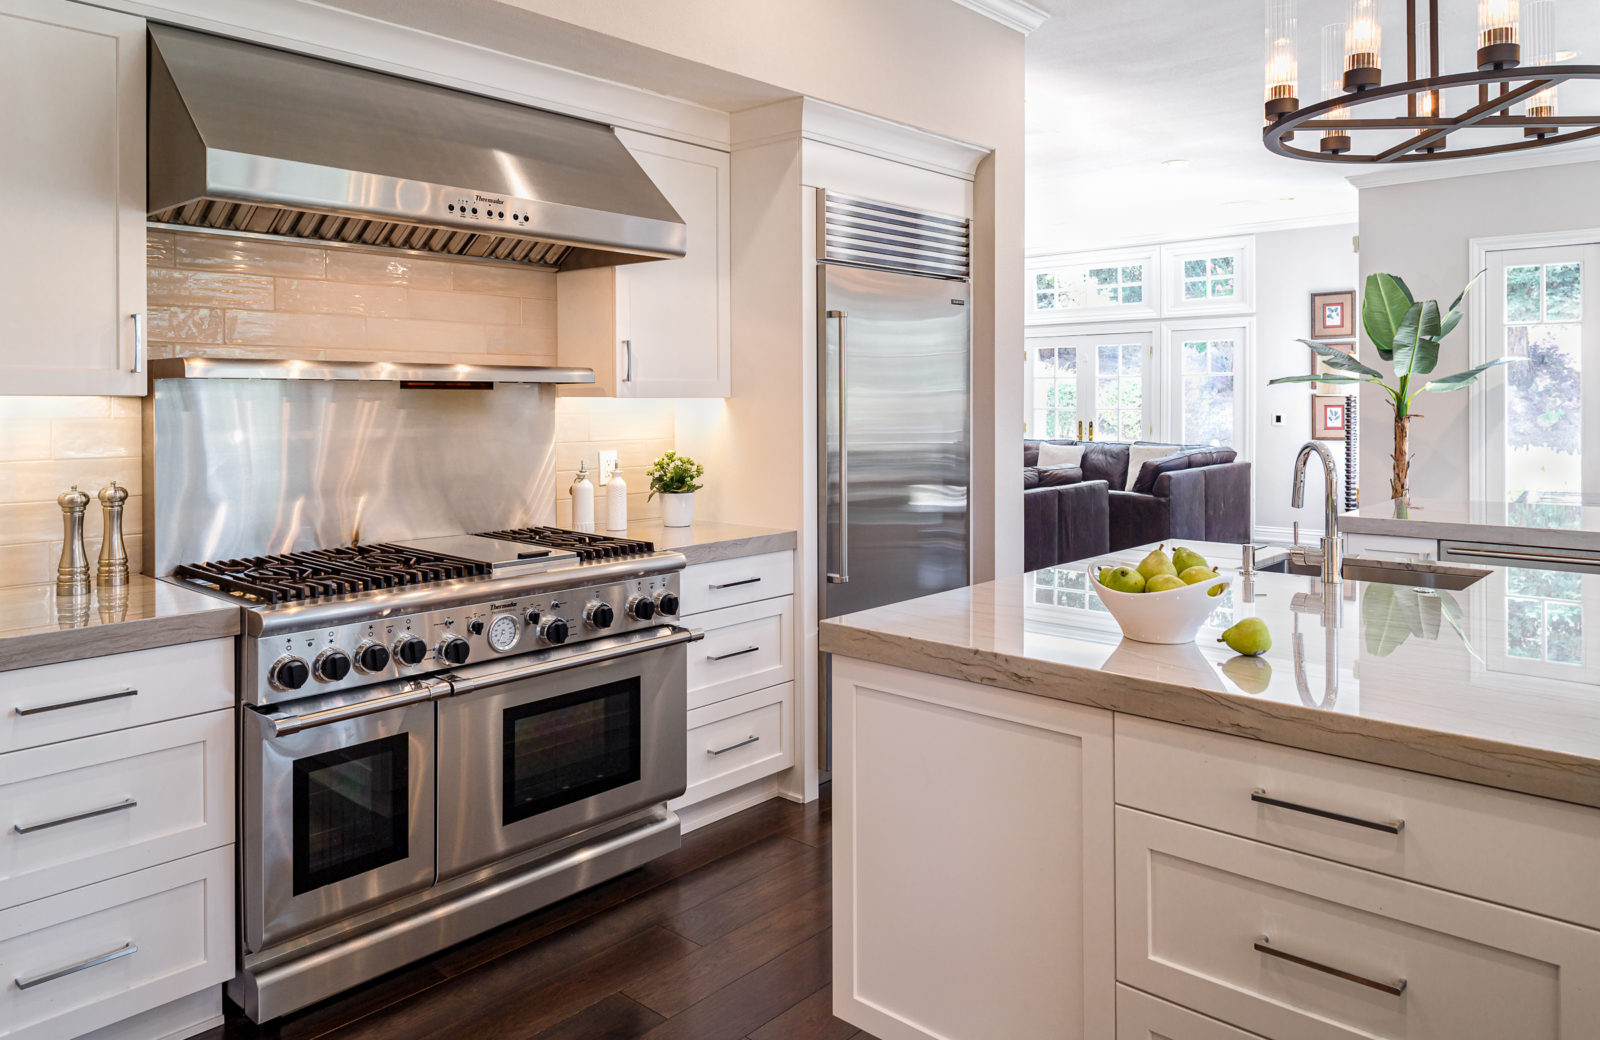
This design features a 48-inch dual-fuel Wolf range with a stainless steel backsplash panel below a glass subway tile wall. The metal is a durable, heat-resistant backsplash directly behind the range—ideal for high-heat cooking and heavy use. It’s a practical choice for anyone who cooks frequently or prepares meals for a crowd, as it helps prevent heat-related damage to more delicate materials like glass tile, which can crack.
How far should backsplash go behind the stove?
The backsplash behind the stove should always cover the full width of the range and extend at least to the bottom of the hood or microwave above. For a more dramatic look—or easier cleaning—many of our East Bay clients run the backsplash to the ceiling, especially behind a statement hood or open shelving.
Does backsplash go behind the stove to the floor?
Typically, no—the backsplash stops at the countertop level behind the stove.
What kind of backsplash is easiest to clean behind range?
Smooth, non-porous materials are the easiest to clean behind the range. Options like quartz, glass tile, porcelain tile, or stainless steel wipe down quickly and resist grease and stains. Avoid textured stone or tiles with heavy grout lines in this area—they may look great but require more maintenance over time.
How to decide where backsplashes start and stop around windows
When exploring kitchen backsplash ideas around windows, there’s no single “right” approach. The best solution depends on your kitchen layout, the materials you’re using and the overall look you’re aiming to achieve. The way you finish the backsplash around kitchen windows can shape the entire wall’s design.
If your window has trim or casing, that edge usually serves as a natural stopping point for the tile. In kitchens without trim, you have two main choices: stop the backsplash around the window at the edge of the drywall or wrap it into the window jamb for a more custom look. If you don’t have trim, you’ll need a clean finish on the upper edge of the backsplash that extends from the cabinets on either side. Consider using options like a Schluter edge, pencil trim, or polished materials that match the face of the tile.
Here are five effective design options for handling the backsplash around window frames and window sills:
Option 1: Wrapping a quartz or tile backsplash around the window jamb
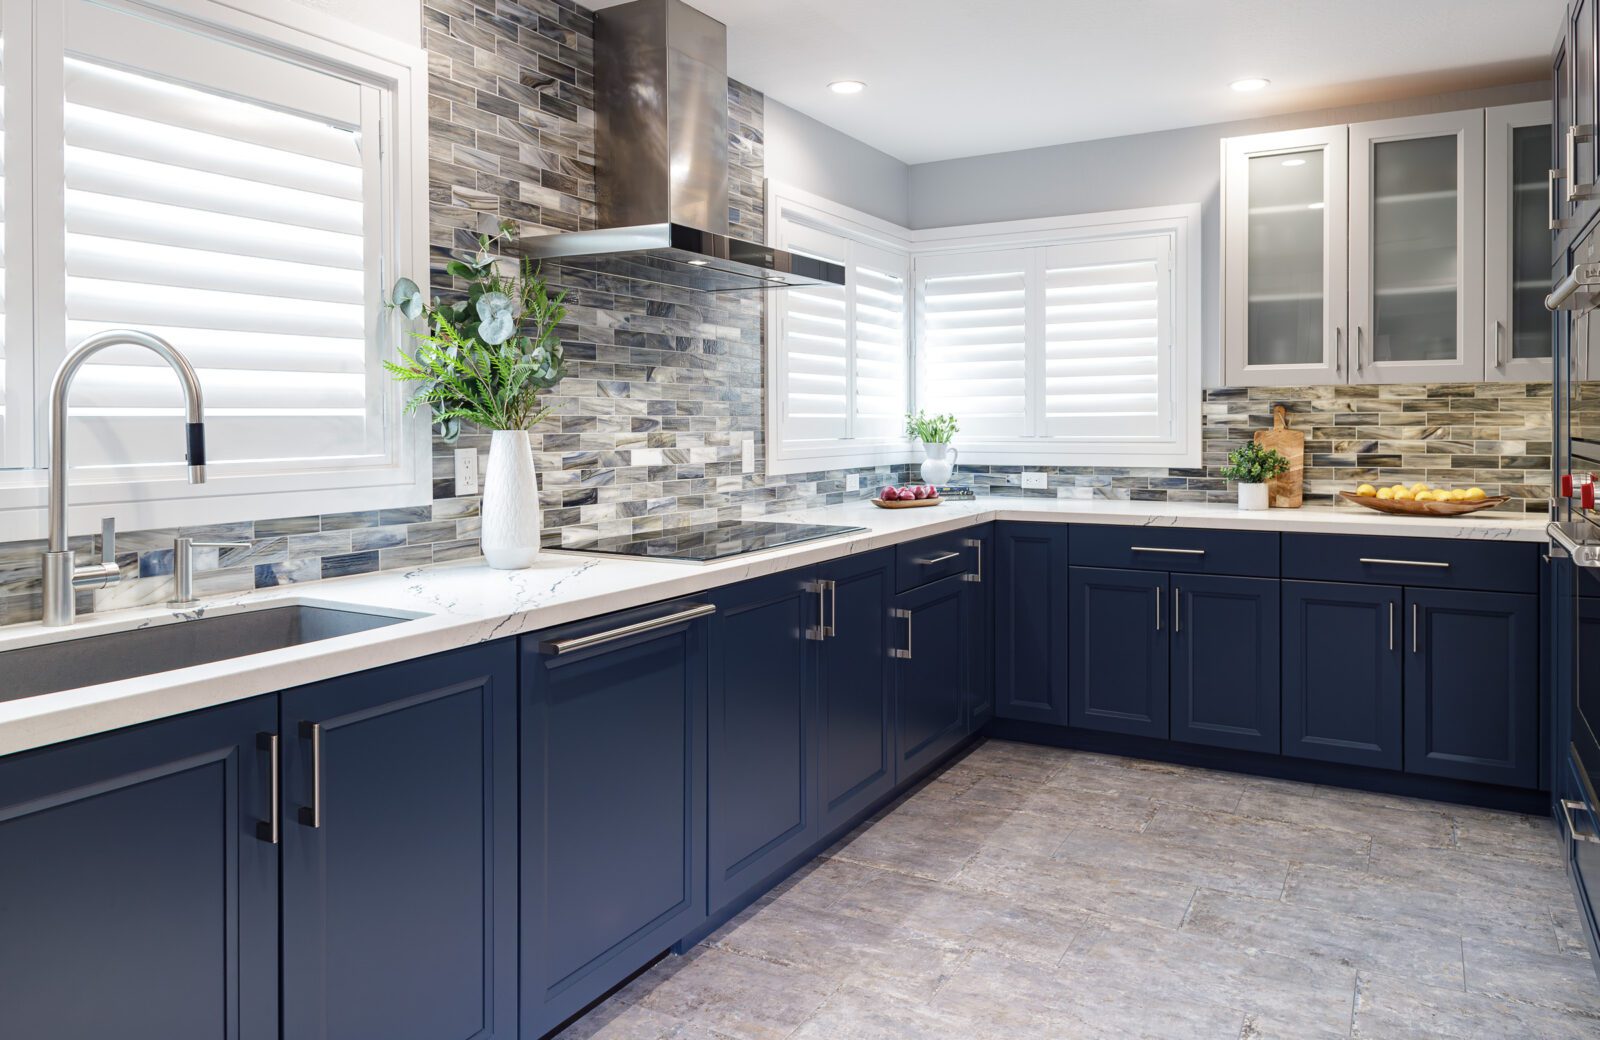
In this East Bay two-tone kitchen, the quartz backsplash runs from the countertop to the upper cabinets and continues cleanly to the window at the same height. The quartz wraps seamlessly into the window jamb with no window trim, while painted drywall finishes the above space. It’s a sleek, modern solution that delivers a clean, trimless look.
Option 2: Stopping a quartz or tile backsplash at a window without trim
In kitchens with a window sill but without window trim, the backsplash can stop at the edge of the window opening, on both the bottom and sides, without wrapping into the jamb, typically up to cabinet height. This creates a clean, minimal look and works well with materials like quartz or tile with finished edges or a metal edge like Schluter.
One important consideration: if you’re keeping existing window coverings, wrapping the tile into the window opening may affect the fit, especially if the original design didn’t include a wrapped finish.
Option 3: Backsplash starting and stopping at the window trim
If your cabinets and backsplash sit flush with the window casing, a clean approach is to end the tile at the trim and use painted drywall above both the tile and the window. In this Alamo, CA kitchen remodel, glass subway tile is installed in a horizontal pattern, running neatly up to the window casing. The result is a classic, timeless look that feels both polished and balanced.
If there’s a small gap between your cabinets and the window casing, extend the backsplash tile to meet the trim and use painted drywall above both the tile and the window. In this Danville, CA kitchen remodel, a playful white and gray patterned tile was used for the backsplash, running cleanly to the casing on both sides of the window and up to the bottom of the upper cabinets for a balanced and clean finish.
This Rossmoor kitchen takes a creative approach to a corner window. On the left side, the glass mosaic backsplash extends to the window trim and all the way to the ceiling, while on the right side, it stops at cabinet height, with painted drywall above. On both sides the backsplash goes all the way to the window trim. The result is a thoughtful blend of symmetry and variation, and the mosaic tile adds depth, texture, and visual interest to the space.
Option 4: Mix and match backsplash layouts for each side of a window
Consider using a different backsplash layout on each side of a window—or even a unique design for each window in your kitchen—to create visual interest and a custom, layered look.
In this Walnut Creek kitchen, they used a cool patina-forged white matte-textured tile backsplash with various rectangular shapes. The white backsplash tile around the kitchen window is treated differently on each side.
On the right side of the left window, the backsplash tile runs to the window trim and up to the bottom of the upper cabinets. There’s no full backsplash on the left—just a backsplash runner. The remaining space is filled with bold, dark blue painted drywall, creating a stylish, asymmetrical design that feels intentional and balanced.
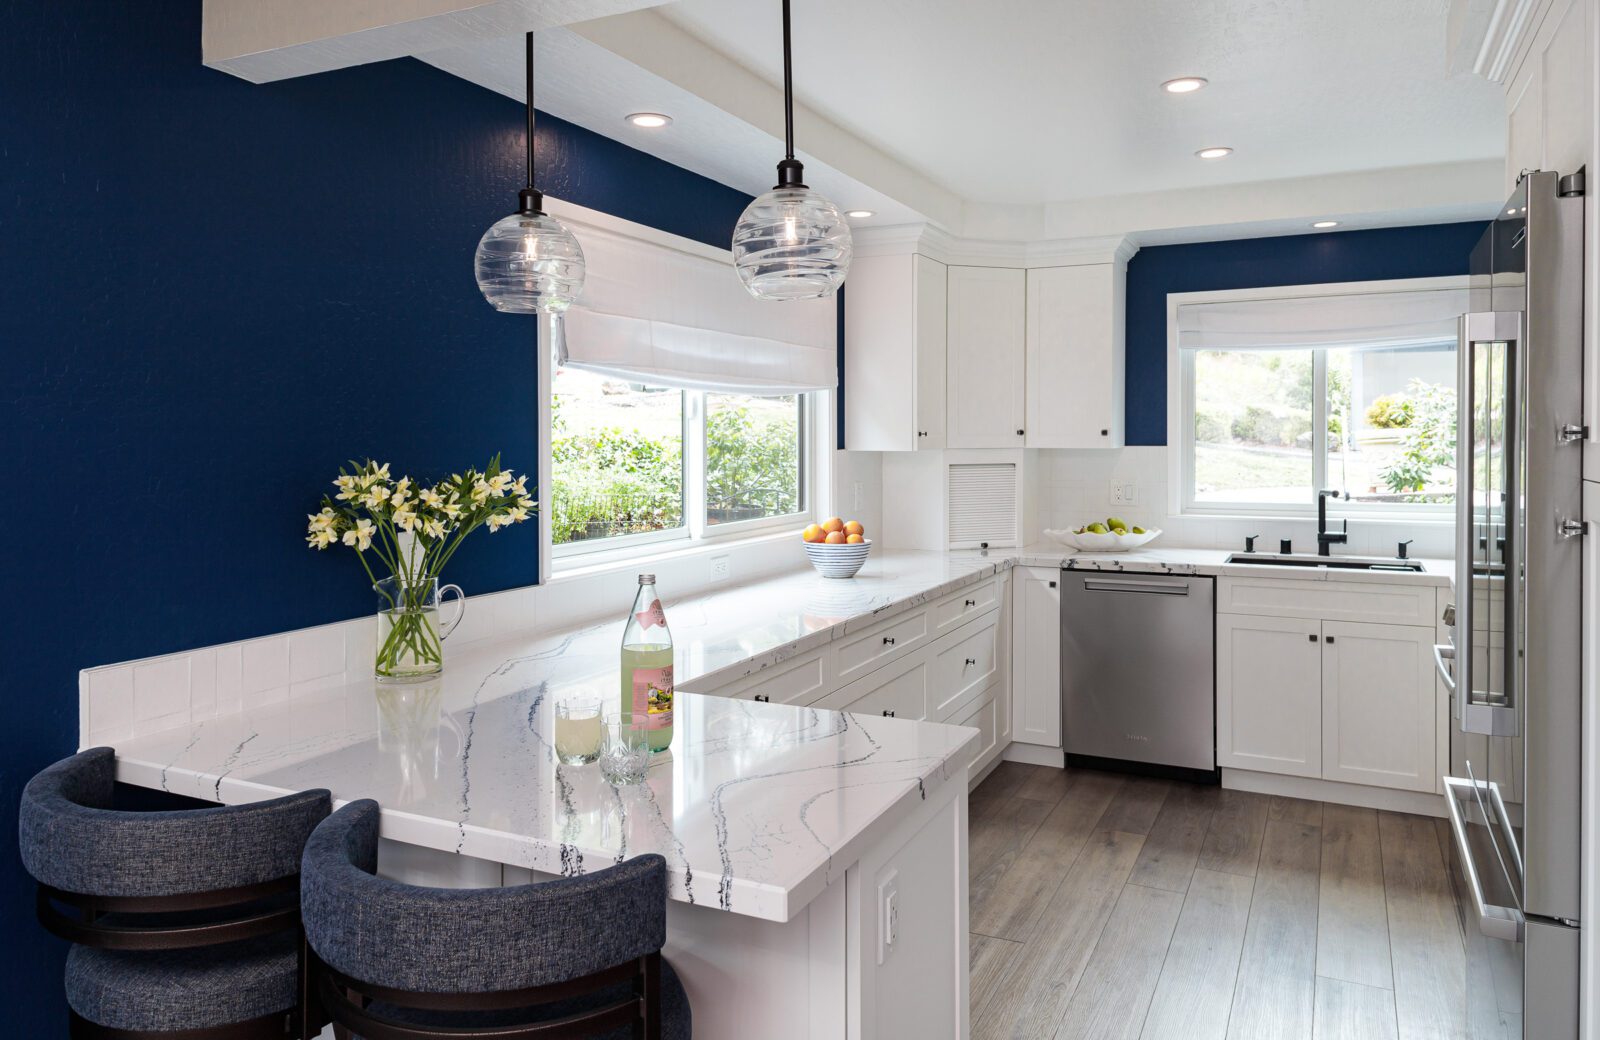
On the right window, the backsplash runs to the window trim and continues up to the bottom of the upper cabinets, with dark blue painted drywall filling the space above.
Option 5: Not using backsplash around window at all
Suppose the window is at the edge of the kitchen, as in this transitional Alamo remodel. In that case, you can stop the backsplash at the end of the cabinetry, leaving the area around the window as painted drywall up to the window trim.
How to design backsplashes around sinks
Regarding backsplashes behind sinks with windows, function matters as much as aesthetics. Since sinks are high-splash areas, the goal is to protect the wall from water while creating a cohesive, well-finished look. A well-planned backsplash behind a sink with a window can handle splashes while enhancing your overall look.
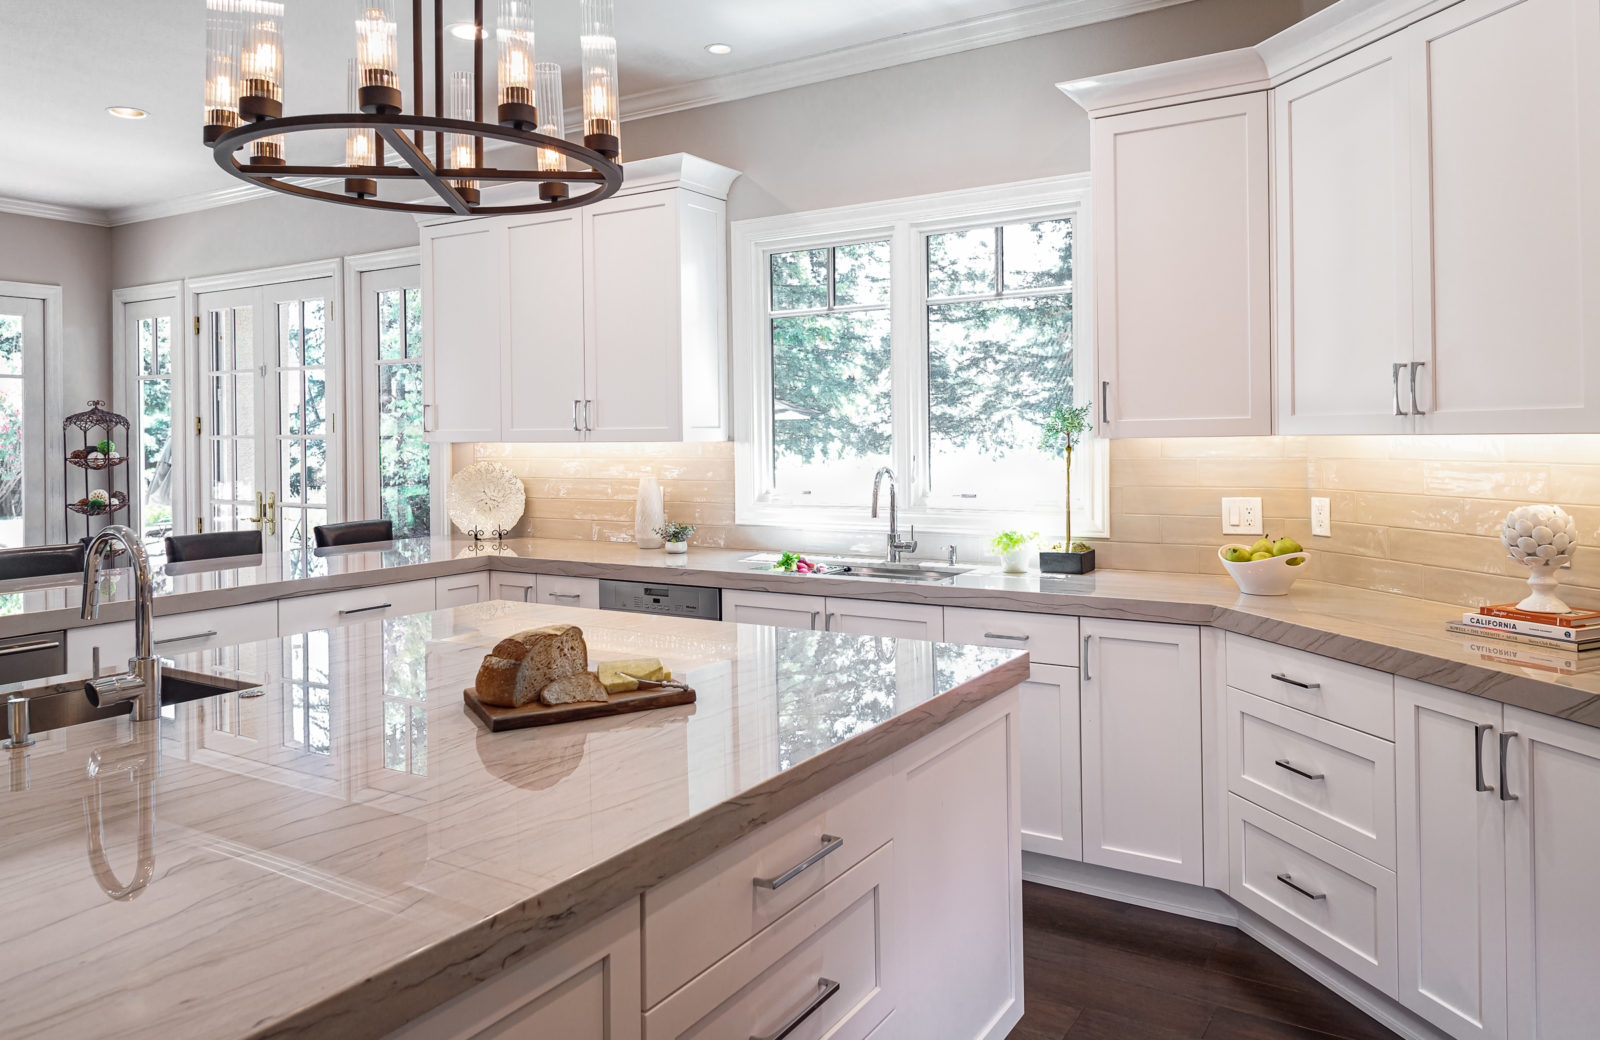
In this Rossmoor example, the backsplash rises to meet the bottom of the window. It wraps around the sides of the window trim, continuing up to the cabinet height on either side for full coverage and a balanced and symmetrical design.
In this East Bay kitchen, the window sits directly at sink level, leaving no space for tile beneath. Instead, the backsplash wraps cleanly around the window jamb, creating a seamless connection between countertop and window.
How to use backsplashes in niches
Backsplashes in niches—such as wine bars, coffee stations, or built-in shelving—offer an excellent opportunity to add visual interest and tie into the kitchen backsplash design. A simple approach is to tile the whole back wall of the niche, creating a clean and cohesive backdrop.
You can also choose whether to wrap tile onto the side walls of the niche for a more enclosed and elevated look. Either approach works!
In this Walnut Creek kitchen remodel, a subway tile backsplash finishes the back of the wine bar niche with open shelving, adding texture and creating a clean backdrop that highlights the display.

How to design backsplash runners
A backsplash runner may be paired with a full-height or cabinet-height backsplash above it, or the wall above the runner may be left as painted drywall. Painted drywall works well in low-impact areas like bar counters, storage zones, or peninsulas, where full-height backsplash coverage isn’t essential.
Backsplash runners with drywall above
A short backsplash runner, usually 4 to 6 inches of tile or quartz above the countertop, can provide just enough protection without covering the entire wall.
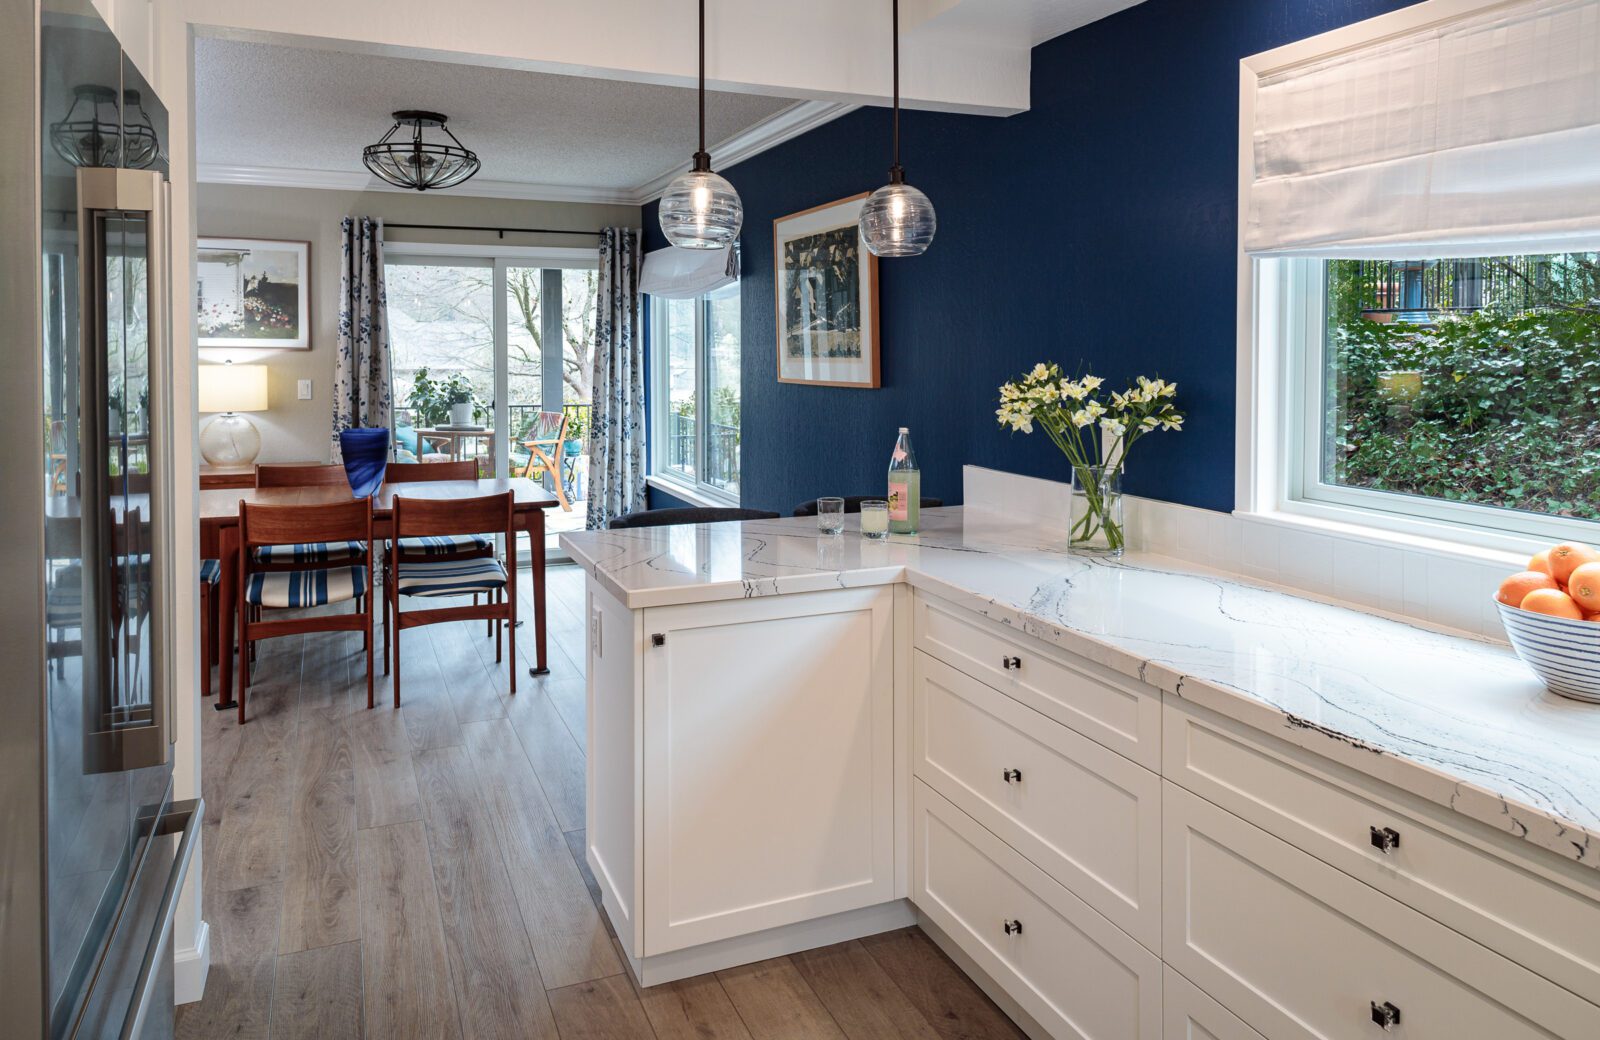
In this Walnut Creek kitchen, the peninsula serves primarily as a dining space with seating, rather than a prep area. The backsplash was kept to a simple runner, with bold painted drywall above to maintain an open feel.
The runner was carefully designed to perfectly fit the windowsill, eliminating the need for additional tile backsplash or trim between the counter and the window.
Are 4-inch backsplash runners outdated?
As always, it depends! A contemporary kitchen with clean lines, like the blue and white kitchen above, still works. However, a granite or busy tile design at 4” may look dated.
Should the backsplash be the same as the countertop?
This is a gorgeous option, but it comes at a cost. A full-height splash of quartz, marble, or quartzite can add 30 to 80% to the countertop cost alone. If you choose to go in this direction, make it look even more upscale by matching the veining or pattern on your materials.
Matching veining on the quartz countertop and backsplash
In this Walnut Creek kitchen remodel, the quartz countertop and backsplash were cut from the same slab, allowing the veining to flow seamlessly from the counter up the wall. This precise matching creates a high-end, cohesive look and turns the backsplash into a natural extension of the surface. It’s a refined detail that adds elegance and visual continuity.
Using two types of backsplash materials
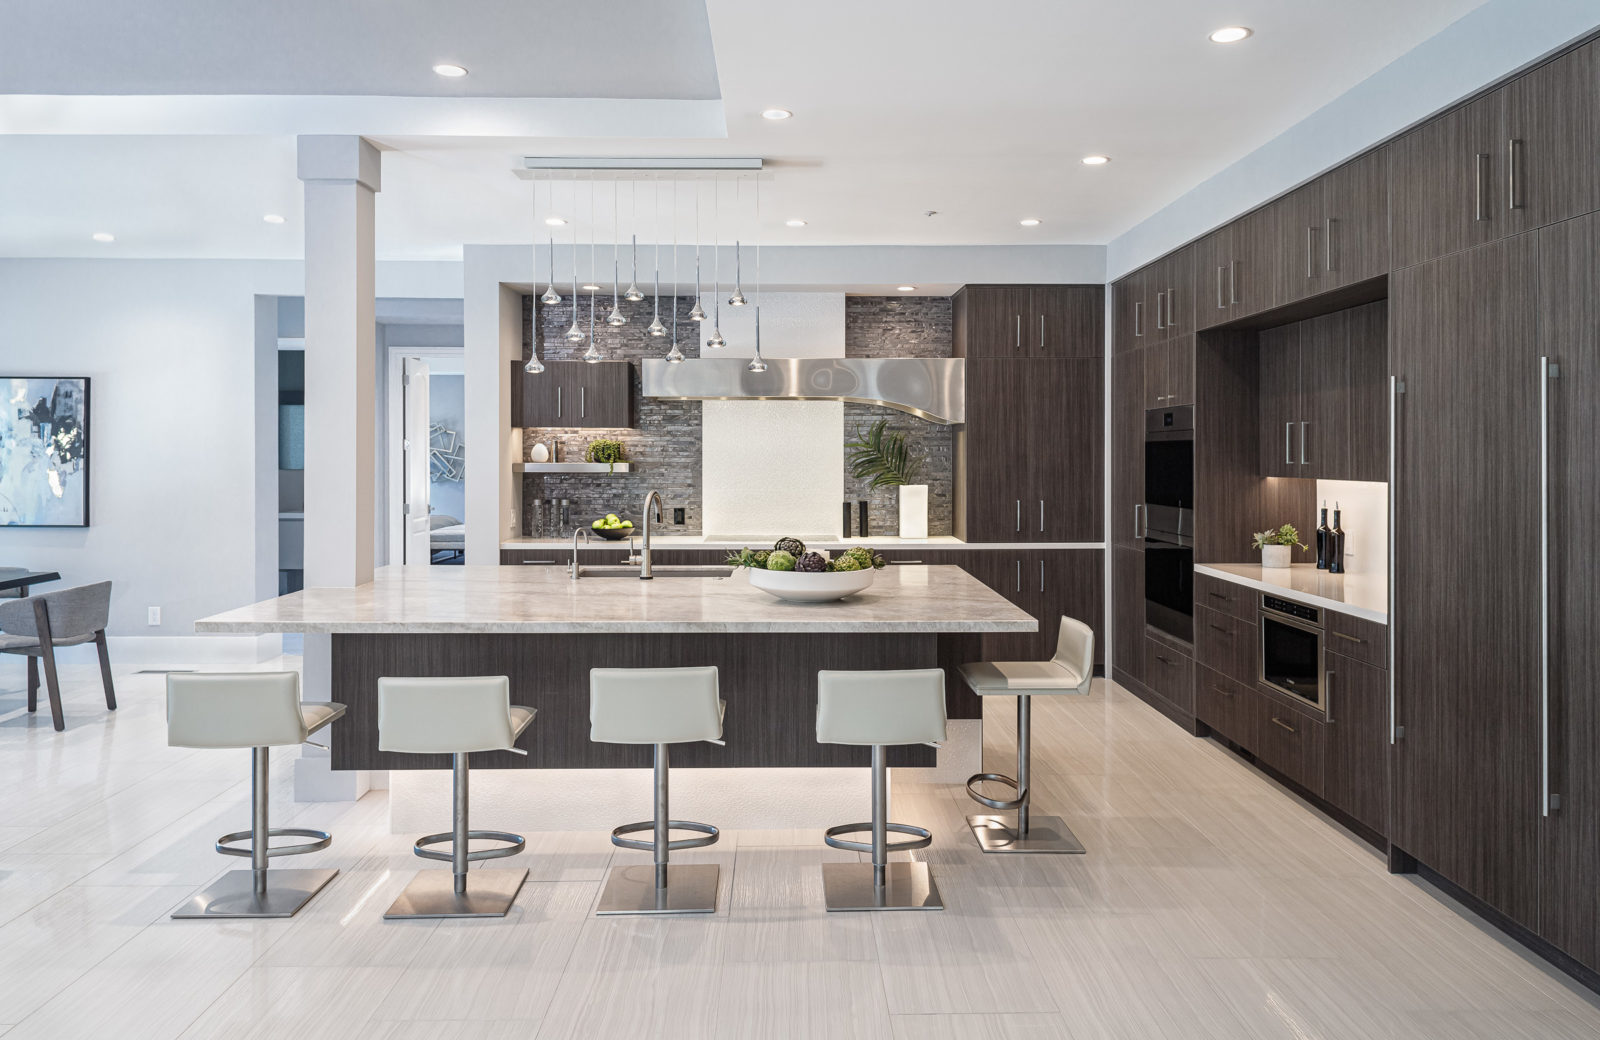
Mixing materials can add depth and personality to a kitchen backsplash design, and this Walnut Creek remodel is a great example. Here, a quartz backsplash was used on one wall for a sleek, seamless look, while an iridescent subway tile creates a standout feature wall in the wine bar niche. The contrast in texture and finish adds visual interest and helps define different zones within the open-plan kitchen with a peninsula.

A dramatic, award-winning backsplash
The award-winning San Ramon kitchen remodel with the blue soda glass backsplash was a focal point in this higher-end open plan kitchen remodel. And it was quite a challenge to create this backsplash statement piece! Finding a glass vendor willing to take on this project was difficult. And we found out why during the production and installation. The vendor fabricated the gorgeous blue glass backsplash four times, as it kept getting scratched during the installation. Soda glass is painted before installation, and the paint is fragile. They finally succeeded, and we feel that this backsplash made a bold statement in this high-end design. Most importantly, the clients love it!
Big kitchen backsplash considerations
The backsplash becomes a significant design element in a spacious kitchen, and often a focal point. With more wall space, your choices can make a bold statement or create visual cohesion across zones like the range wall, sink area, and bar or coffee station. But more space also means more decisions! Here are some things to think about:
- Cohesion vs. Contrast – Do you want one backsplash material throughout or a combination of materials for different zones?
- Statement walls: Consider extending the backsplash to the ceiling behind the range or open shelving to draw the eye upward.
- Material impact – Large kitchens can support full-height slabs of quartz or marble for a luxurious look.
- Lighting and reflection – In big spaces, glass, metal, or light-toned tile backsplashes can help bounce light around.
- Balance is key – If you have a statement countertop or floor, use a simple backsplash to provide balance, and vice versa. For example, a quartzite countertop with bold movement pairs beautifully with a large-format white subway tile backsplash to create contrast without visual overload.
Big kitchens also give you room to break the “rules.” Don’t be afraid to play with unexpected layouts, shapes, or feature areas. You can even mix backsplash heights—full height in one section, runners in another—to help define different functional zones.
Small kitchen backsplash considerations
In smaller kitchens, every design decision carries extra weight, including the backsplash. It can either open up the space or make it feel cluttered. The right backsplash design can maximize visual interest without overwhelming the room. Here’s what to keep in mind:
- Keep it light and bright – Lighter backsplash colors or reflective materials like glass tile can help a small kitchen feel more open and airy.
- Minimal patterns – Clean lines and subtle textures prevent the space from feeling too busy.
- Efficiency counts – Smaller spaces often mean smaller budgets, so backsplashes are a great way to add high-end detail without high-end cost.
Backsplashes can stop and end anywhere you want them to!
Backsplashes are far more than a finishing touch. They are a key element of kitchen design that blends form and function. From full-height tile installations and wrapped windows to sleek quartz runners and mixed-material feature walls, the options are nearly endless. Whether you’re deciding how to handle a tricky corner, where to start and stop your backsplash tile, or whether to take it all the way to the ceiling, the right approach depends on your layout, materials, and personal style.
Backsplashes can be part of a full remodel or a kitchen refresh.
Ready to transform your space with a kitchen remodel that balances beauty and practicality? Contact us today to schedule a consultation at (925) 944 0153 —we’ll help you make every tile, trim, and transition feel just right.